Realtek HD Audio Manager is an excellent software package for controlling the sound settings on Windows operating systems. This driver package comes with complete support for all the significant sound codecs, providing your system full support to playback multimedia, process audio, manage speakers, record audio, and more. Additionally, the package boasts an awesome user-accessible interface for controlling all your sound/audio capabilities. Irrespective of being one of the most widely used audio drivers, there are cases when it becomes unresponsive. When the respective driver goes missing or out of date, then you may face numerous issues with your audio on Windows PC. Therefore, it is important to update Realtek audio drivers from time to time in order to fix audio playback sound problems.
Methods to Download, Install and Update Realtek HD Audio Manager for Windows 11, 10 PC
Using any of the methods explained below, you can easily perform Realtek HD audio manager download on your Windows 10, 11. Let’s take a look at them below:
Method 1: Manually Download Realtek HD Audio Manager from Official Site
You can execute the Realtek audio manager download from the official website of Realtek. Before you try this method, just be sure to collect all the information about the model number of the device and the version of the Windows operating system. Below are the steps you need to follow in order to download Realtek audio driver from its official site: Step 1: Firstly, visit the official site of Realtek. Step 2: Then, search for the correct driver file according to your Windows OS version and download it. Once downloaded, then double click on the same and follow the on-screen instructions to install Realtek HD audio driver on your computer. Lastly, reboot your computer to apply the recent changes and restore sound drivers. Also Read: How to Fix Realtek RTL8723BE Driver Issues on Windows PC
Method 2: Update Realtek HD Audio Manager in Device Manager
Another way to perform Realtek HD Audio Manager download is using Device Manager. It is a default component of the Microsoft Windows operating system. It lets users view and control the hardware connected to their PC. So, if a specific piece of hardware stops working fine, then the default program highlights that hardware for the user to find and overcome the issue. In general, you can use Device Manager to update USB drivers. To do so, simply follow the steps below: Step 1: On your keyboard, altogether hit Windows +X keyboard keys. Step 2: Find and click on Device Manager from all the available options.
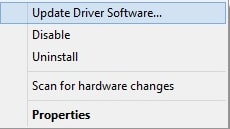
Step 3: In the Device Manager window, expand Sound, video, and game controllers by making a double click on it. Step 4: Then, click right on your Realtek HD audio driver and choose Update Driver Software.
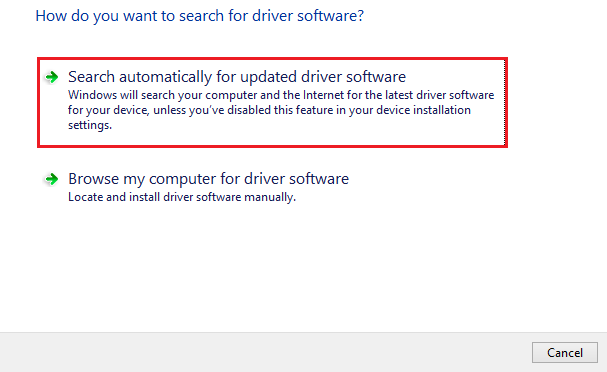
Step 5: Next, select the option that says Search Automatically for Updated Driver Software.
Now, sit back and wait until the Device Manager searches for the available driver updates for Realtek audio manager. If detected, the tool automatically installs the latest version of Realtek HD audio manager on your Windows 10 or 11 PC. Once everything is finished, reboot your computer. Updating the Realtek audio drivers helps you fix generic audio driver problems.+ Also Read: Realtek Ethernet Controller Driver Download & Install for Windows 10/8/7
Method 3: Use Bit Driver Updater to Automatically Install Realtek HD Audio Driver (Recommended)
If you are a non-tech user, then there are chances of installing the wrong drivers using the above two methods. In that case, you can use Bit Driver Updater to get the correct drivers installed on your computer. Bit Driver Updater is the most promising driver updater tool that quickly scans your PC for outdated, faulty, or corrupted device drivers. This driver updater tool is well-known for simplifying the entire process of finding, downloading, and installing the drivers. Furthermore, it installs only WHQL tested and verified drivers. With this program, you can even install the latest version of all PC drivers with a single click of your mouse. But, for this, one has to use the paid or full version of Bit Driver Updater. Because its free version is partly manual and updates drivers one by one. Here’s how to use Bit Driver Updater to perform Realtek HD Audio Manager download on Windows 10 or 11. Step 1: From the button below, download Bit Driver Updater for Free.
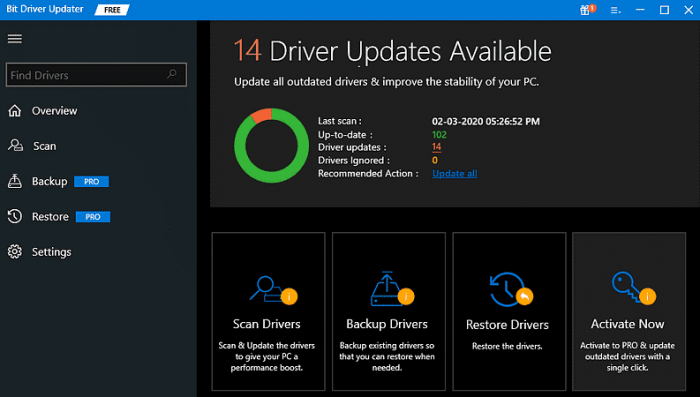
Step 2: Run Bit Driver Updater’s setup file and follow the instructions that appear on your screen. Step 3: Once the software is installed, launch it on your computer and make a click on Scan from the left pane. This may take a few minutes.
Step 4: Wait until scan results appear on your computer screen. After that, go through the list and find the outdated Realtek HD audio driver, then click on the Update Now button next to it. As suggested, if you are using the pro version of Bit Driver Updater, then you can also click Update All instead. This way you can install various drivers at once.
What’s more, Bit Driver Updater’s pro version also comes with 24*7 technical support and a 60-days full money-back guarantee. Also, this is the more straightforward and quickest way to install the latest version of PC drivers and fix all possible issues related to outdated, broken, or faulty drivers. Also Read: Download Realtek Wifi Driver for Windows 10, 8, 7 PC
Realtek HD Audio Manager Download and Install for Windows 11, 10: DONE
In this article, we have suggested the most possible methods to download and update Realtek HD Audio Manager on Windows 10, 11 PC. We hope you find this installation guide useful. Please let us know if you have any doubts or queries through the comments section below. If you liked this tutorial, then do subscribe to our Newsletter for more such guides related to technology. Apart from this, stay in touch with us on Facebook, Twitter, Instagram, and Pinterest.


