Switch to Google DNS in Windows 10 and MacOS
When you connect your computer to internet, it automatically uses the DNS Servers of your service provider. This default setting on Windows computers and MacBooks is designed to make it easy for users to connect to internet, without going through the hassle of setting up DNS Servers. This convenient setup works well as long as the DNS Servers of your service provider are working well and have the capacity to handle DNS queries generated by its users. If you are frequently experiencing slow browsing speeds and network problems, switching to Google DNS might help in fixing the problem. Google’s Public DNS Server is free to use and users have reported fixing network connectivity issues by making a switch to Google DNS.
1. Change DNS Server to Google on Windows Computer
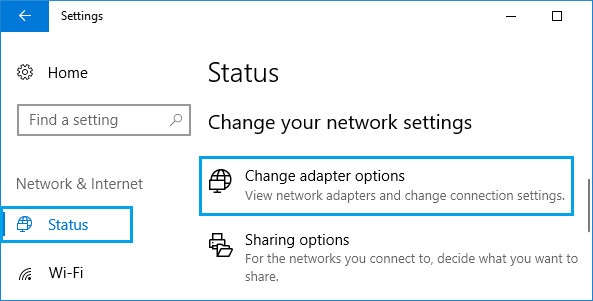
Follow the steps below to change DNS Servers on Windows 10 computer to Google DNS. 1. Open Settings > click on Network & Internet. 2. On Network & Internet Settings screen, scroll down in the right-pane and click on Change Adapter Options.
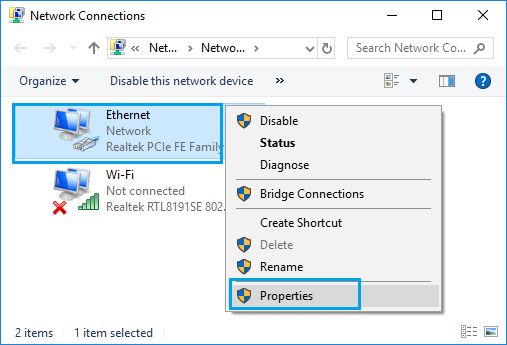
- On the next screen, right-click on the Network (WiFi or Ethernet) for which you want to change the DNS Server.
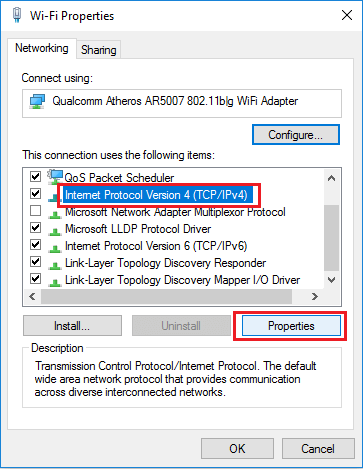
Note: You will be prompted to enter your Admin Password, in case you are not currently logged in with your Admin Account. 4. On WiFi/Ethernet Properties screen, select Internet Protocol Version 4 (TCP/IPv4) and click on Properties.
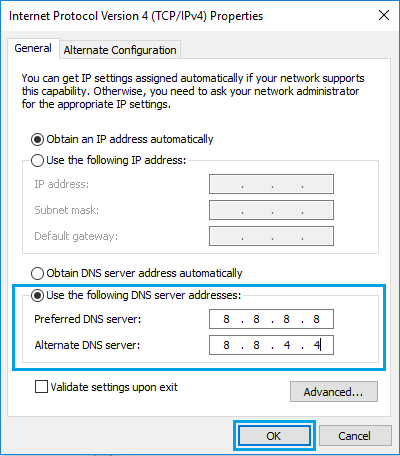
On the next screen, select Use the following DNS Server addresses option and enter 8.8.8.8 as your Preferred DNS Server and 8.8.4.4 as the Alternate DNS server.
Click on OK to save the new DNS Server settings on your computer. Restart your computer and you should now find it connecting faster to internet and loading webpages faster than before.
2. Change DNS Servers to Google DNS on Mac
Follow the steps below to switch DNS Servers on MacBook, Mac Mini or iMac to Google DNS.
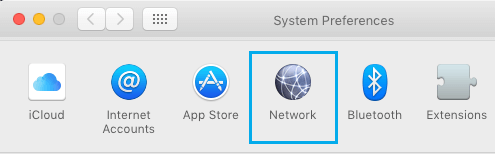
Click on Apple Logo and select System Preferences in the drop-down menu.
On System Preferences screen, click on the Network tab.
On the Network screen, click on the Lock Icon.
On the pop-up, enter your Admin User Name and Password to unlock System Preferences.
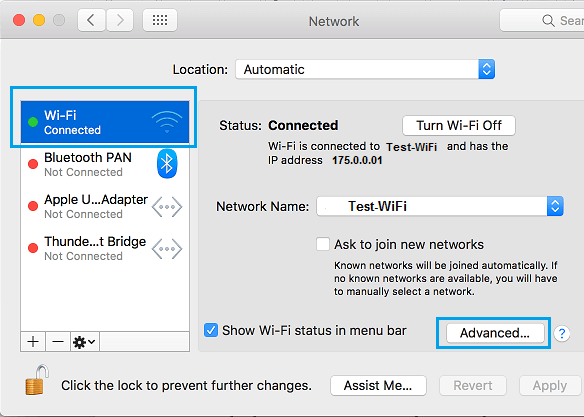
Next, select your Network (WiFi/Ethernet) and click on the Advanced button.
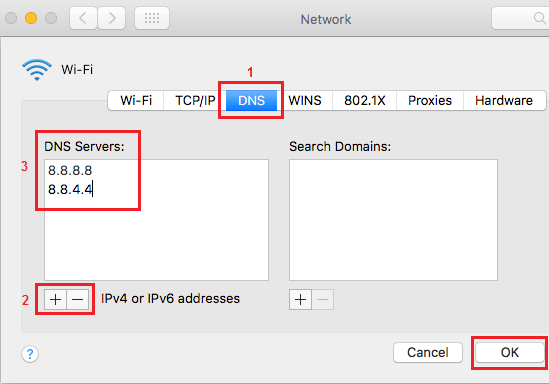
On the next screen, select DNS tab > click on the + button and enter 8.8.8.8 and 8.8.4.4 as new DNS entries.
Use the – button to remove old DNS entries and click on OK. Your Mac is now setup to use Google DNS and it will use the new DNS settings to resolve DNS queries originating from your device.
How to Change Router IP Address How to Change Router DNS Server

![]()
![]()