Generally, users first use Windows 10 devices and then switch to macOS. This switch can be really helpful for some, but may also pose problems for users who are habitual of using the Windows 10 OS. To help such users, the creators of the Parallels Desktop 13 app came up with the tool. With the help of this software, any Mac user can easily install Windows 10 on macOS. Using this tool, you can avail the advantages of running both operating systems consecutively as required. However, it’s easier said than done to use Windows 10 on Mac. To help you with this, we have come up with this simple guide. Here, you will find the step-by-step solution for how to install Windows 10 on Mac using Parallels Desktop. So, let’s dive into the easy procedures and install the OS right away.
A Step-By-Step Tutorial to Install Windows 10 on Mac Using Parallels Desktop 13
Before proceeding with the process of installing Windows 10 on Mac via Parallels Desktop 13, you will need to make sure that your MacBook meets the minimum requirements. But, before moving ahead, as always, just be sure to take a backup of your device so that you will stand on the safer side in case of any mishap.
A Mac Must Have….
850 MB of available disk space on the boot volume.Intel Core 2 Duo, Core i7, Core i5, Core i3, Intel Core M, or Xeon processor.At least 4GB of memory, however, 8GB of memory would be a perfect option.SSD drive for enhancing and boosting overall performance.Mac must be using OS X Yosemite 10.10.5 or higher.Make sure that your Mac supports Windows 10.
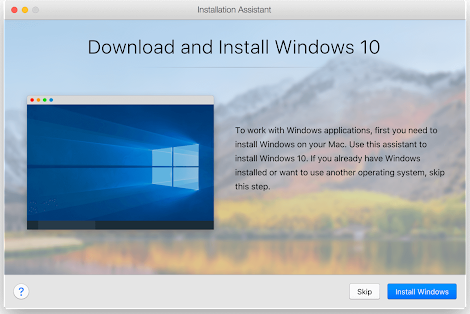
Also Read: How to Clear Safari’s Cache and Cookies on Mac After checking all the basic requirements, you can follow the steps below to get started with the process of installing Windows 10 on Mac using Parallels Desktop 13. Step 1: First and foremost, you need to download the Parallels Desktop 13 on your Mac. Step 2: Once the program is downloaded, click double on the ParallelsDesktop.dmg file in order to invoke it. Step 3: After that, launch Parallels Desktop, then find and double-click on the Install to proceed. Step 4: Now, a confirmation box will appear, you need to click on Open to confirm the action that you wish to install Parallels Desktop. Step 5: Next, accept the License Agreement. Step 6: In the next window, write the Name of the Administrator & Password for your MacBook. Once you have installed the Parallels Desktop successfully, you’ll be redirected to the page where you’ll get an option to download Windows 10. So, if you already have a copy of Windows 10, then you can skip this step by clicking on the Skip option. Next, expand the Parallels Desktop drop-down menu and click on New to proceed. Now, select a copy of Windows 10 that you have from the available options. And, if in case, you do not have it, then click on Install Windows to continue.
Step 7: Thereafter, you will need to sign in to your Parallels Desktop’s account. You will get an option to make one if you do not have an account. Once you have successfully signed up for the Parallels Desktop account, Windows 10 will display in an all-new window. That is it! See how simple it is to install Windows 10 on Mac using Parallels Desktop 13. The process seems pretty much like you’re accessing a browser with a virtual desktop of Windows 10. Also Read: How to Reset iTunes Lockdown Folder on Mac and Windows
Wrapping Up!
Undoubtedly, it’s a big yes that macOS is considered to be more efficient and secure than Windows. But, the difference between these two reliable and the most popular OS has shrunk, all thanks to the arrival of numerous imposing new features in Windows 10. So, that’s all! Using the steps shared in this detailed informative guide, one can easily install Windows 10 on Mac using Parallels Desktop 13. Hopefully, this article has proven of immense help. Please feel free to share your queries or feedback in the comments section below. We will love to hear from you. Subscribe to our Newsletter for more tech-related articles, and information. In addition to this, you can also follow us on Facebook, Twitter, Instagram, and Pinterest.

