Erase iPhone Before Selling
All that is required to Erase Everything from iPhone is to Factory Reset your device using Settings, iCloud or by connecting your device to a computer. However, there are a number of things that you need to do before going ahead with the steps to Erase iPhone using the Factory Reset Process. Also, you need to be aware that manually deleting Photos, Contacts and other data from iPhone while you are still logged-in to your device can lead to this information being deleted from iCloud. Hence, it is recommended that you follow all the applicable steps as provided below, before going ahead with the steps to erase iPhone using the Factory Reset process.
1. Backup iPhone to iCloud/Computer
The first vital and mandatory step is to make sure that you make a Backup of your device to iCloud, Mac or Windows PC using iTunes. In this regard, it is important that you understand the difference between iTunes and iCloud Backups and select a method that suits you the best. We recommend that you both backup your data to iCloud and also download a complete back of iPhone on Mac or Windows computer.
2. Transfer 2FA Accounts
If you are using Google Authenticator or any other authenticator App to login to online accounts, it is really important that you transfer these accounts to your new iPhone. You may find yourself locked out of all your 2FA protected accounts, if you forget this important step.
3. Transfer Photos to Computer or Storage Device
If your iPhone is not set to automatically upload Photos to iCloud, you need to make sure that Photos that are stored on the internal storage of your old iPhone are transferred to Mac or an external storage device. Even if are uploaing Photos to iCloud, it is recommended that you make an additional backup of Photos on your iPhone to computer or an external storage drive.
4. Unpair Apple Watch
Bring iPhone and Apple Watch close to each other and open the Watch App on your iPhone. Tap on My Watch tab in bottom menu > tap on the info button (i) next to the Apple Watch that you want to remove.
On the next screen, select Unpair Apple Watch option > On the confrmation pop-up, select the Unpair option to confirm.
5. Turn OFF Find My iPhone
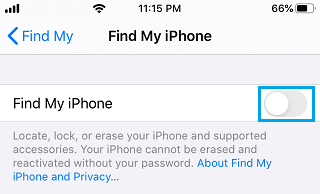
You won’t be able to Erase Data from iPhone, if it is still linked to Apple’s Find My iPhone service. You can Turn OFF Find My iPhone, right on your device and also by logging into your iCloud Account on a Mac or Windows computer. Go to Settings > tap on your Apple ID Name > Find My > Find My iPhone > move the toggle next to Find My iPhone to OFF position.
On the confirmation pop-up, enter your Apple ID Password and tap on Turn OFF.
6. Sign-out from iPhone
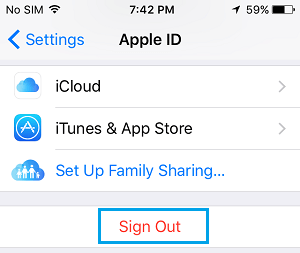
The next step, before erasing all the data from your old iPhone is Sign-out from iPhone, which should automatically sign you out from all iCloud related services (App Store, Photos and others). Open Settings > tap on your Apple ID Name > scroll down and tap on the Sign-out option.
On the pop, enter your Apple ID Password and tap on Turn OFF. On the next pop-up, tap on the Sign Out option located at top-right corner. On the confirmation pop-up, tap on Sign Out option to completely sign-out of Apple ID on your iPhone.
7. Erase All Data from iPhone
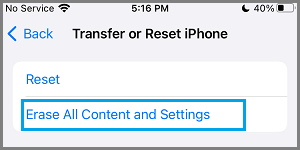
The easiest way to delete everything from iPhone is to Factory Reset your device using Settings App as available on iPhone. Go to Settings > General > Transfer or Reset iPhone > select Erase All Content and Settings option.
On the next screen, tap on Continue > Enter Lock Screen Passcode > On the Confirmation pop-up, select Erase iPhone option to start the Factory Reset process. Once the Factory Reset process is completed, all the Data on your iPhone will be completely wiped out and you will find your device restarting with Hello screen.
Note: Make sure that you do not interrupt the Factory Reset process in any way and patiently wait for your device to restart.
How to Transfer Data From Old iPhone to New iPhone How to Free Up Storage Space on iPhone and iPad

![]()
