Disable Touch Screen in Windows 10/11
The Touch Screen feature in Windows 10/11 allows you to open Apps, Files and interact with the computer, without using the Keyboard or Mouse. However, you may sometimes find the need to keep the Touch Screen disabled in order to improve battery life and to prevent the possibility of opening a wrong slide or file during a presentation. You may also find the need to Disable Touch screen if it suffers from Phantom or Ghost Touch and also to prevent the possibility of children accidentally deleting files or changing settings on the computer. While there is no option within Windows Settings to disable the touch screen, it can still be done using 2 different methods as provided below.
1. Switch OFF Touch Screen Using Device Manager
Before going ahead with the steps to disable Touch Screen, make sure that your device supports other methods of input (Keyboard or Mouse).
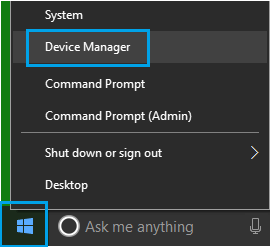
Right-click on the Start button and click on Device Manager.
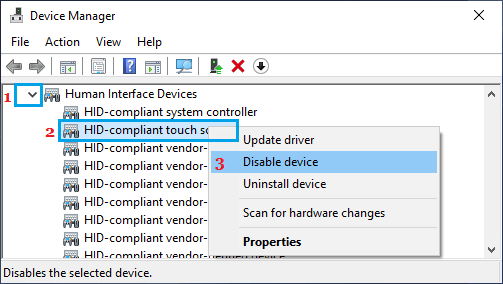
On Device Manager screen, expand Human Interface Devices entry > right-click on HID-Compliant Touch Screen and select Disable Device option.
On the confirmation pop-up, click on Yes to confirm.
After this you won’t be able to use the Touch Screen on your computer, until the next restart.
2. Enable Touch Screen in Windows 10/11
As mentioned above, Windows should automatically Enable the Touch Screen, when you restart the computer. If this does not happen, you can manually enable Touch Screen using the following steps.
- Right-click on the Start button and click on Device Manager.
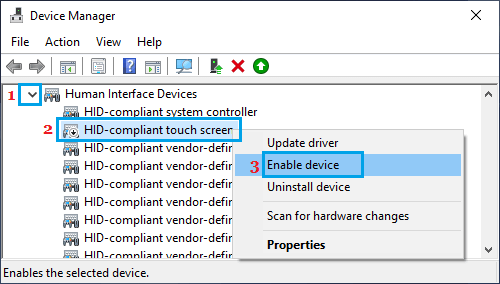
- On Device Manager screen, expand Human Interface Devices entry > right-click on HID-Compliant Touch Screen and select Enable Device option.
After this, you will be able to use the Touch Screen method of input on your computer.
3. Disable Touch Screen Using Registry
If you do not want the Touch Screen to become active after the Restart, you can modify the Touch Registry to prevent this from happening.
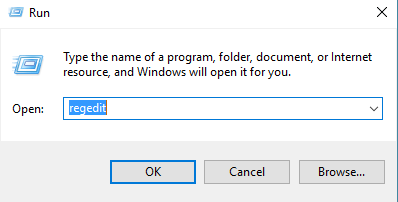
Right-click on Start Button and click on Run. In the Run Command window, type regedit and click on OK.
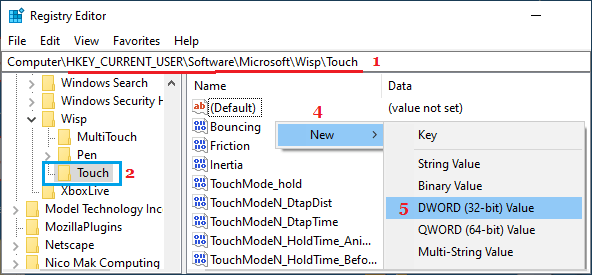
On the Registry screen, navigate to Computer\HKEY_CURRENT_USER\Software\Microsoft\Wisp\Touch
Click on Touch Folder in the left-pane. In the right-pane, right-click in any empty space and select DWORD (32-bit) Value option.
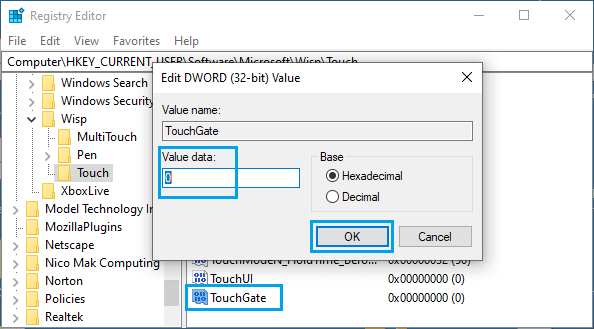
Name this newly created DWORD as TouchGate.
Double-click on TouchGate and make sure its value is 0.
Restart the computer for the above change to be implemented. After the computer restarts, you will not be able to use the Touch Screen. If required, you can enable Touch Screen on your computer by changing the TouchGate value from 0 to 1 or by deleting the TouchGate entry.
How to Disable Firewall in Windows 11/10 How to Quickly Lock Screen In Windows 10