Change MAC Address in Windows 10
Every device that connects to the internet is required to provide or declare its IP Address and also the MAC Address to the Network. While the IP Address of a computer is dynamically assigned by the Router, its MAC Address is assigned at Hardware level and remains the same for life of the device. Since, MAC Address of a device is coded at Hardware level, there is really no way to change the original MAC Address of a device. However, it is possible mask or hide the real MAC Address of a computer by forcing the computer to declare or broadcast a different MAC Address to the Network. In general, users want to change the MAC Address of their computers to bypass blocked networks and also to test MAC Address filtering.
Before Changing MAC Address
Before going ahead with the steps to change MAC Address, it is important that you note down the original or the actual MAC Address of your computer. This can be useful, if you run into problems after changing MAC Address and need to go back to the original or default MAC Address. If your computer connects to WiFi and Ethernet, it will have two MAC Addresses, one for Ethernet and the other one for WiFi. Also, if your WiFi Network is using MAC Filtering, you need to make sure that the New MAC Address is white listed on the Modem/Router.
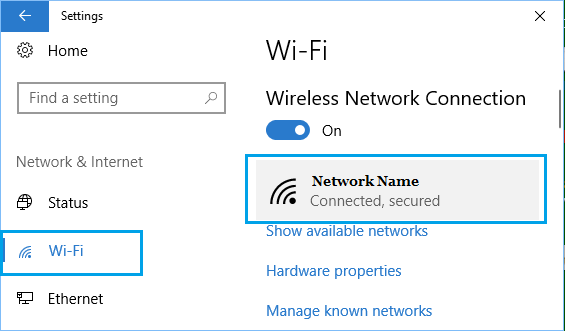
Open Settings > click on Network & Internet.
On the next screen, select your Network (WiFi or Ethernet) in the left-pane. In the right-pane, double-click on your Network Name.
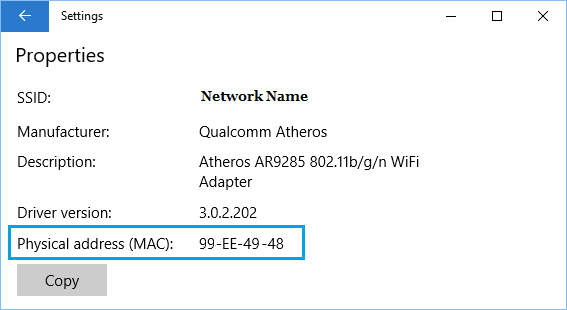
On the next screen, the MAC Address of your computer will be under “Properties” section, next to Physical Address (MAC) entry.
Copy the MAC Address to a text file and keep the file at a safe location on your computer.
How to Change MAC Address in Windows 10
If required, you can change the MAC Address of your computer using the following steps.
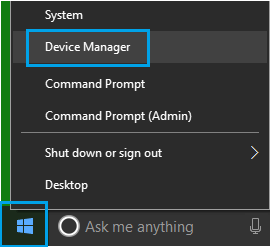
Right-click on the Start button and click on Device Manager.
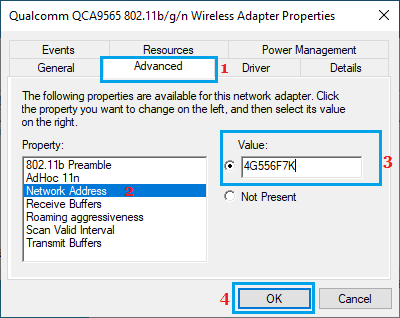
On Device Manager screen, expand Network Adapters entry > right-click on Wireless or Ethernet Adapter and click on Properties.
On properties screen, switch to Advanced Tab > select Network Address entry > check Value entry and type New MAC Address.
Click on OK to save the New MAC Address on your computer. Note: Enter New MAC Address without using hyphens.
How to Confirm if NEW MAC Address is Working?
After changing MAC Address, you can follow the steps below to confirm if New MAC Address is working.
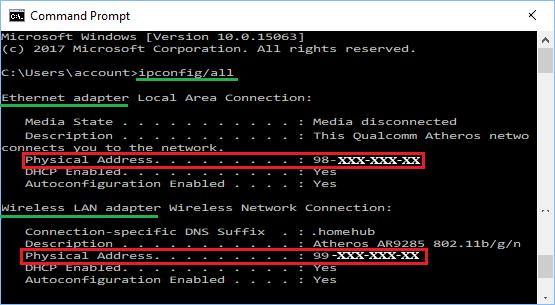
Open Command Prompt (Admin) > type ipconfig/all and press the Enter key.
Once the command is executed, you should find the NEW MAC Address listed under “Ethernet Adapter” or “Wireless Adapter” section next to Physical Address entry.
You should be able to use the New MAC Address without encountering any problems, unless you are using MAC filtering and the NEW MAC Address is not listed on your Router.
How to Download Windows 10 ISO File to USB Drive How to Backup Windows 10 Computer